
How to Fix YouTube Audio Renderer Error on Windows 10/8/8.1/7
YouTube is one of the most popular video streaming platforms nowadays. There are millions are users who are using YouTube to watch videos in their daily life. However, there are some common problems that people face over time while watching YouTube. And one of the most common problems that the users face is the YouTube audio renderer error. It is one of the most annoying issues faced by regular YouTube users. So, if you are also facing this problem on YouTube, then you just have come to the right place. In this guide, we’ll share how you can Fix YouTube audio renderer error easily in two minutes.
It is very easy to fix YouTube audio renderer error while watching videos on this platform. There are many users who have faced this issue already. So, if you are one of them, then don’t worry. Because below we have provided the possible fixed to this problem. You can solve it easily on your PC and watch YouTube again if you follow the steps correctly. There are simple fixes are available to this issue. So, you don’t have to worry if you are seeing YouTube audio renderer error while watching this popular streaming platform.
What is YouTube Audio Renderer Error?
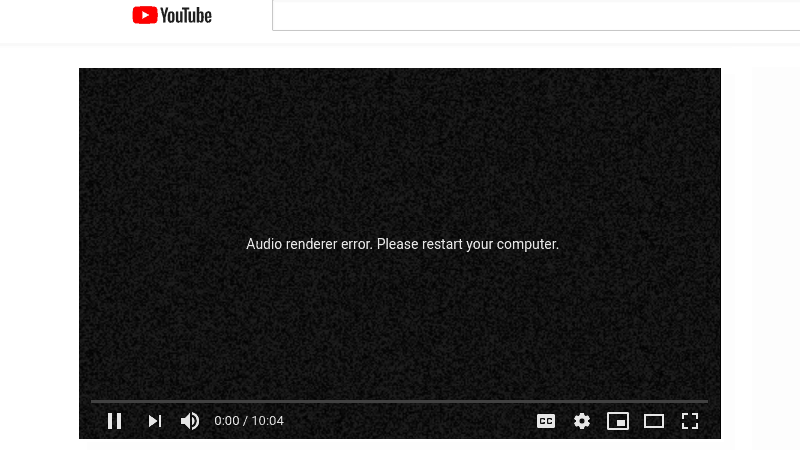
YouTube audio renderer error is an error message that people often see on the YouTube player screen while watching YouTube. When this message appears, users can’t watch any video on YouTube. So, it is one of the most annoying issues that people face on YouTube. However, if you are facing YouTube audio renderer error on your PC, you can fix it easily. There’s nothing much to do when you see the message. Usually, a black screen appears and you see the message on the screen of your PC.
All browser users including Google Chrome, Mozilla Firefox, Internet Explorer, etc can face this issue. And no matter which operating system a user is using, they can see this message on the screen of their device while watching YouTube. You close the browser and open YouTube again and probably the same message would appear. So, it’s important that you fix YouTube audio renderer error in order to watch YouTube again and watch your favorite videos. There are can be several reasons why users face this problem on the platform. No matter what the cause of the problem is, you can solve it easily on your PC.
The most common cause behind this problem is the audio driver of your PC. Sometimes, the audio driver of your PC can get corrupted. So, when this happens and you open YouTube on your PC, it might show the YouTube audio renderer error on your PC. As you can get the audio driver easily on your PC, just follow the below steps where we have provided the possible fixes to fix YouTube audio renderer error on your PC. You can do that easily without any issues. There are different methods to fix this problem.
How to Fix YouTube Audio Renderer Error on PC?
1. Restart your PC and Change Audio Output
Well, if you read this message that you get with this problem, it says ‘Audio renderer error. Please restart your computer’. So, the first thing that you need to do when you face this problem is, you should restart your computer and check if the audio is working or not. This is the most common fix for this problem. So, first of all, close all the browsers and restart your PC. Then see if you are getting the same notification or not.
If it’s no solved by restarting your PC, you can change the audio output once. If you are using a music system on your PC as the audio output, unplug the audio cable and plug it. Also, try using a headphone and see if you are getting the same message or not. These are some of the basic things that you can try to fix the YouTube audio renderer error on your PC. If you are not able to solve the issue by doing this, just follow the below methods. And you’ll be able to solve it successfully. Below, we have provided all the possible methods to solve it.
2. Update the Audio Driver of your PC
As the problem is related to audio, the audio driver of your PC might get corrupted and you face this issue. So, the next method is to update the audio driver of your PC and see if you are getting the same problem or not. You can use a 3rd party driver updater to update the audio driver of your PC. However, if you don’t want to use a 3rd party driver updater software, then you can do it from the Driver manager of your PC. Just make sure you haven’t disabled the Windows Update on your PC. Else, the Driver updater of Windows will not work.
- First of all, right-click on My Computer then click on ‘Manage’.
- Go to ‘Device Manager’ and there you’ll find all the drivers that are available on your PC.
- From below, double click on the ‘Sound, video, and game controllers’ option.
- There, you’ll find the audio driver. Most of the time, it’s a Realtek audio driver.
- Double click on the Audio driver.
- Then go to the ‘Driver’ tab.
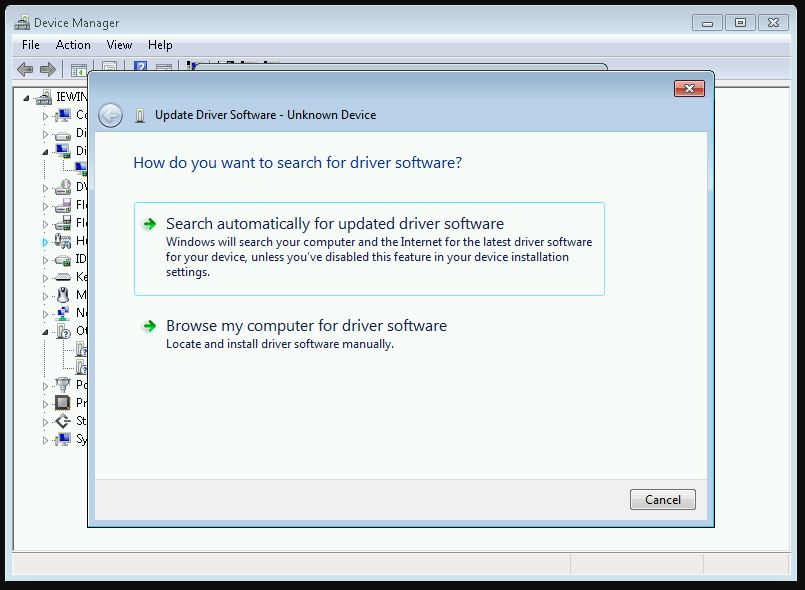
- There, you’ll find the ‘Update Driver’ option. Click on it.
- Now, click on the ‘Search automatically for updated audio driver software’ option.
- It’ll start searching for the new version of the audio driver. When it finishes, close the option and restart your PC.
That’s it. Now see if you are getting the YouTube audio renderer error or not.
3. Rollback audio driver
If you have updated the audio driver of your PC recently, then you might face the audio renderer error on YouTube. So, you have updated the audio driver recently, and then facing the issue, you can try to roll back the audio driver and see if the issue is fixed or not. It is very easy to roll back the audio driver to the previous version on your PC. And many users reported that they have solved the issue with this method. So, just follow the below steps to roll back the audio driver on your PC.
- First of all, right-click on My Computer and click on ‘Manage’.
- Now, click on ‘Device Manager’ and there you’ll find all the drivers available on your PC.
- From the lower section, double click on the ‘Sound, video, and game controllers’ option.
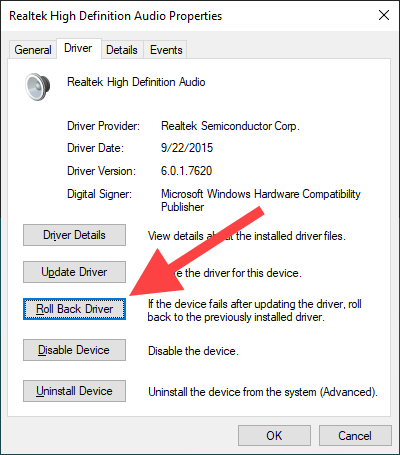
- There, you’ll find the audio driver. Double click on it and go to the ‘Drivers’ tab.
- Now, click on ‘Roll back driver’ to roll back the audio driver on your PC.
- That’s it. Now, it’ll roll back the driver. After the process completes, you can open YouTube and see if you are getting the same error message or not.
4. Disable the Driver and enable it
Now, if all the above methods are not working, you can just disable the driver and then enable it to fix the issue on your PC. It is very easy to do that. So, just disable the audio driver of your PC and enable it to fix YouTube audio renderer error on your PC.
- Right-click on My computer and go to the ‘Manage’ option.
- Click on the ‘Device Manager’ option on your PC.
- Double click on the ‘Sound, video, and game controllers’ option and select the audio driver.
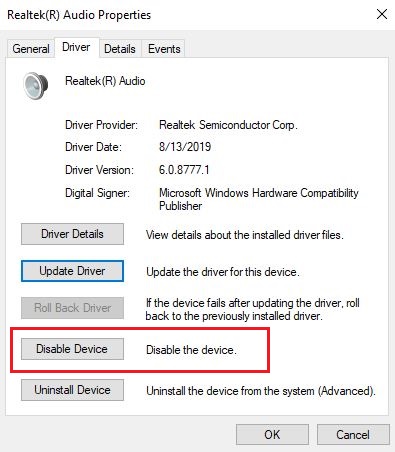
- Click on the audio driver and go to the ‘Driver’ section.
- There, you’ll get the ‘Disable Device’ button. Click on it.
- After disabling the audio driver, just click on ‘Enable Device’ and close the option.
That’s it. Now check if the problem is solved or not. Open YouTube and see if you are getting the same message or not. If you are not getting the message, that means the problem is solved.
5. Update Bios
If you are using a dell laptop and facing this problem, then the issue might lie in the bios of your laptop. There are many Dell laptop users who reported that they have face this issue on their PC. And after updating the bios of their laptop, the problem has been solved. So, if you are using a dell Laptop, then you can try updating the bios of your laptop to solve this problem. It is not easy to update the bios of your laptop. If you have done it earlier, then you can do it again without any issues.
However, if you haven’t updated the bios of your laptop once, you should take help from the Internet and then try. Open YouTube on another device, and search for ‘BIOS update laptop model’. You’ll get many guides on the Internet that you can follow and update the bios on your laptop. So, just follow the steps and you’ll be able to fix the issue for sure. You should also note that BIOS updating is a sensible part where if anything goes wrong, your laptop will be dead. So, try at your own risk.
6. Run Windows Audio Troubleshooter
Windows audio troubleshooter is a built-in option of Windows that helps you to solve all the issues related to audio on your PC. So, while solving the audio renderer error, you can run the troubleshooter and fix the issue easily. Although the troubleshooter might not find the problem, it worth trying once to fix the issue on your PC. And it’s very easy to run the troubleshooter. So, you can easily do it and solve the issue on your PC. If the method is not working, just follow the other methods on this post.

- First of all, click on the Start Menu on your PC and click on the ‘Settings’ option.
- Now, go to the ‘Update and Security’ option from there.
- Select the ‘Troubleshoot’ option from there. It is the option to troubleshoot different things on your PC.
- Now, click on the ‘Playing audio’ option and click on the ‘Run the troubleshooter’ option from there.
- That’s it. It’ll now start the Audio troubleshooter on your PC and see if anything is wrong with the audio option. If anything is wrong, it’ll fix the issue automatically.
So, just run the troubleshooter to fix the audio renderer error on your PC.
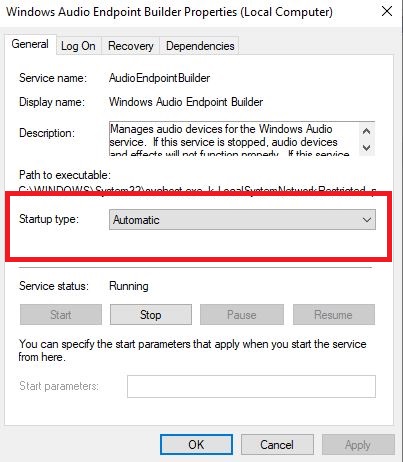
7. Enable Windows Audio Endpoint Builder
Windows audio endpoint builder is a service that manages audio devices for the Windows audio service. So, if this service is disabled, the audio device of your PC will not properly. So, for any audio-related options, the Windows audio endpoint builder option should be enabled. By default, on Windows PC, it is enabled. However, if for some reason, the option is not enabled, you can enable it manually and fix the audio renderer error on your PC. Just follow the below steps to enable this option on your PC.
- First of all, press the Windows+R key at the same time and open Run. You can also search ‘Run’ in the run box on your PC and open Run.
- Now, type services.msc and hit enter. It’ll open the service option on your PC.
- Now, from all the services, look for the Windows Audio Endpoint Builder option and double click on the option when you find it.
- It should be enabled or Automatic by default. If it’s not, that means the problem is with this option. So, just set the option to ‘Enable’ or ‘Automatic’ and click on Ok.
That’s it. Now, check if the YouTube audio renderer problem is solved or not. If you don’t see any error message, that means that you have solved the problem successfully.
Read Also: Viber for PC
Final Words
So, guys, I hope you have found this guide helpful. If you liked this guide, you can share it on your social media platforms. Just use the share buttons below to share this guide. Above, we have described all the possible methods to solve the audio renderer error on Windows PC. So, you can follow the above steps and solve the issue easily. If you have any questions or queries, you can ask them in the comment section below.


![[Fixed] Why Can’t I Deactivate My Instagram Account?](https://thetechyinfo.com/wp-content/uploads/2023/04/Why-Cant-I-Deactivate-My-Instagram-Account-768x431.jpg)