How to Take Screenshot on Samsung A32 in 2023
Do you want to take screenshot on your Samsung A32 device? If yes, then you just have come to the right place. Samsung A32 is a popular budget Android smartphone from Samsung. However, when taking screenshots on this device, many users might face problems. But no more. Because we have described the methods to take screenshot on this device below. So, you just need to follow the methods to take screenshots on your Samsung device.
Usually, the simplest way to take screenshot on your Samsung device is by using the screenshot keys. However, there are other methods are available as well to take screenshot on your Samsung A32 device. And below, we have described the methods that’ll help you to take screenshot on your device. So, you can choose your preferred method to take screenshot easily on your Samsung device. Just follow the guide below, and you’ll be able to do that. You can also read about fixing Samsung Galaxy Note 8 apps keeps crashing issue.
How to Take Screenshot on Samsung A32?
Below, we have described different methods to take the screenshot on your A32 device. So, you can choose your preferred method, and take screenshots easily without any issues.
1. Using Hardware Keys
The first method to take a screenshot on your Samsung device is by using the hardware keys of your Samsung device. This is the easiest method to take a screenshot on your Samsung device.
Android OS has the feature of taking screenshots using the hardware keys of your device. So, you can use the same method on your Samsung device to take the screenshot. Just follow the step-by-step guide below to do that.
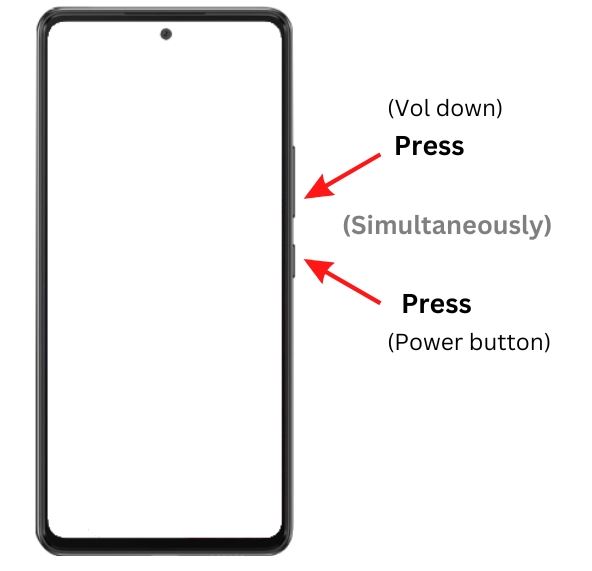
- First of all, open the page on your Samsung device that you want to capture.
- Then, press the Volume Down+Power button at the same time to take the screenshot.
- You’ll hear the sound of capturing. It’ll capture the screen.
That’s it. Now, just open the gallery of your device, and find the screenshot in the ‘Screenshots’ folder. From there, you can edit or share the screenshot.
2. Using Google Assistant
Google Assistant is another option to take screenshot on your Samsung A32 device. Every Android device which has Google app built-in has the Google assistant feature. And one of the best things about Google Assistant is, you can take screenshots on your device using Google assistant.
So, just use this feature, and you’ll be able to take screenshot on your Samsung device. Below, we have described the steps to do that. So, just follow the steps below to take screenshot on your Samsung device using Google Assistant.
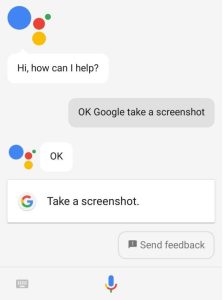
- First of all, open the Google app on your Samsung A32.
- Then, click on your profile picture from the right corner and go to the Settings>Google Assistant>Hey Google & Voice Match and turn on the ‘Hey Google’ feature.
- Now, open the page that you want to capture.
- After that, just say, ‘Hey Google, take a screenshot’.
That’s it. It’ll take the screenshot. Now, you can go to the Gallery option of your device and view the screenshot.
3. Using Palm Swipe Feature
Palm swipe to capture is a unique feature that you get with your Samsung smartphone. This feature helps you to take a screenshot on your device by swiping your palm on your screen. So, if you want to a screenshot quickly on your Samsung A32 device, this feature will help you do that.
However, to use the Palm swipe to capture feature, you need to turn this feature on first. This comes under Motion & Gesture option. So, turn this feature on, and you’ll be able to take screenshot quickly on your Samsung device by just swiping on your screen. Below, we have described how you can do that. So, just follow the step-by-step guide below to take the screenshot.
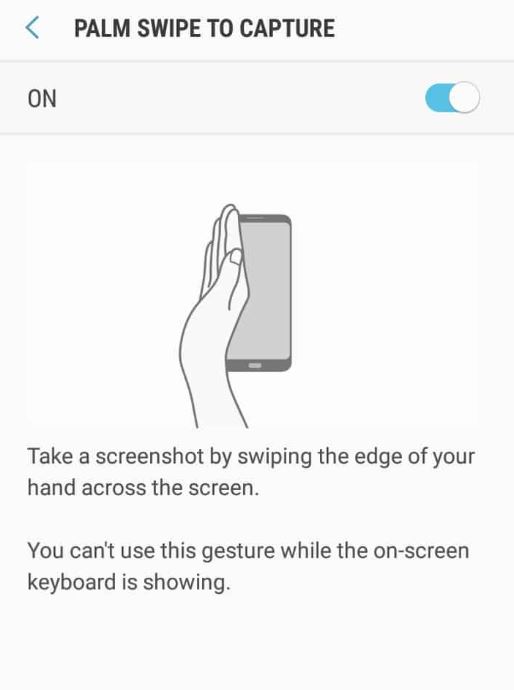
- First of all, open the Settings option on your Samsung A32.
- Then, go to the Advanced Features>Motions & gestures option, and turn the ‘Palm swipe to capture’ option on.
- It’ll turn on the feature. Now, open the page that you want to capture.
- Just swipe the edge of the screen of your Samsung A32 with your palm, and you’ll see that it has captured your screen.
That’s it. Now, just open the Gallery option of your device, and you’ll find the screenshot there.
4. Using Samsung Assistant Menu
You can also take screenshot on your Samsung A32 device by using the Samsung assistant menu. The Samsung assistant menu is a feature of Samsung devices that helps you to get access to different shortcuts quickly including taking screenshots.
So, you can turn on the assistant menu on your Samsung device, and use it to take a screenshot when you need. Below, we have described the step-by-step guide to take screenshots on your Samsung device using the assistant menu. So, follow the guide below to do that.
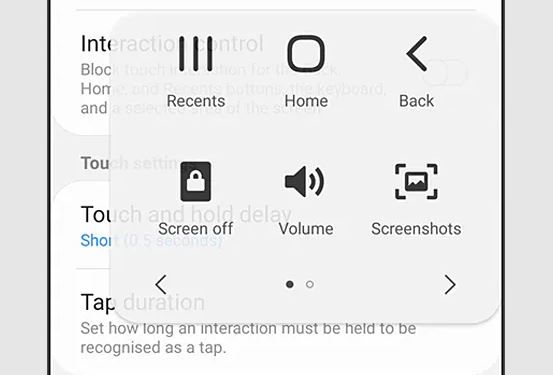
- First of all, open the Settings option on your device.
- Then, go to the Accessiblity>Interaction and dexterity>Assistant menu option and turn it on.
- It’ll turn on the assistant menu on your device. Now, just click on the assistant menu from the right corner of your device.
- You’ll get the ‘Screenshot’ option. Click on it to take the screenshot.
- That’s it. It’ll take screenshot on your device.
Now, just go to the ‘Gallery’ option and you’ll find the screenshot.
5. Using 3rd Party Apps
Last, but not the least method to take screenshot on your Samsung A32 is, you can use a 3rd party app to do that. There are various 3rd party apps are available that helps you to take screenshot on your device. So, you can use any of them to take a screenshot on your device. Just download the app, and you can take customized screenshots on your Samsung A32.
Conclusion
It’s really easy to take screenshots on your Samsung device. Just follow the above method, and you’ll be able to take screenshot easily without any issues. We have described different methods to do that. If you have any questions or queries, you can ask in the comment section below. You can also provide your feedback in the comment section.


![[Fixed] Why Are My Instagram Links Not Working?](https://thetechyinfo.com/wp-content/uploads/2023/09/How-to-fix-Instagram-Links-Not-Working-768x431.jpg)