
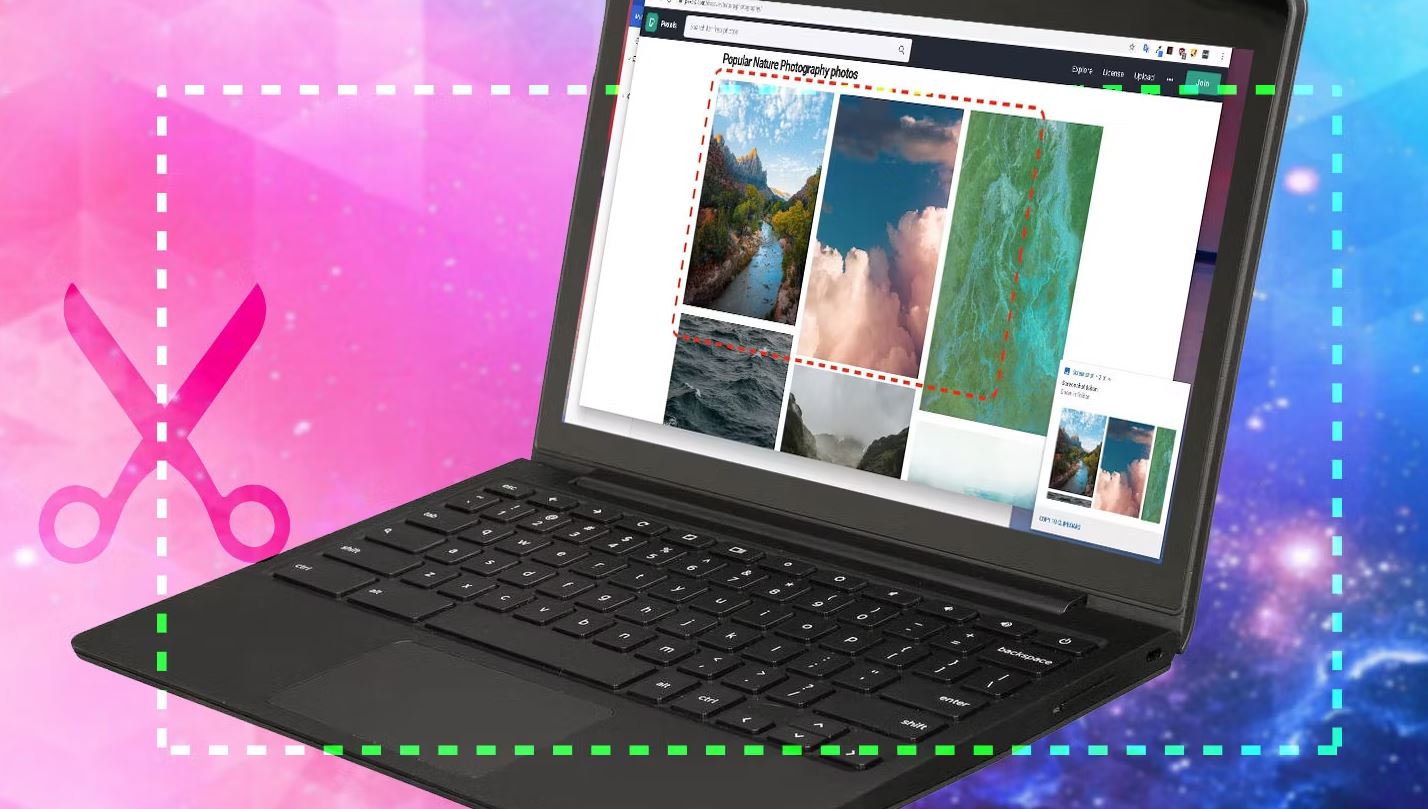
How to Use Snipping Tool on Chromebook to Take Screenshots
ChromeOS power Google Chromebooks that is different from the regular Windows or Android OS. However, there are thousands of Chromebook users worldwide who uses a Chromebook laptop or tablet in their daily life. And some of them want to use the Snipping tool on their Chromebook.
So, if you want to do the same and get the Snipping tool on your Chromebook, you have come to the right place. Below, we have described how you can take screenshots with the snipping tool on ChromeOS easily without any issues. So, just keep reading if you want to do that.
What is Snipping Tool?
Snipping tool is a built-in app that you get on Windows PC that helps you to take screenshots on your Windows PC or laptop easily. You can select the area and take a partial screenshot with the help of the Snipping tool.
That’s why it is one of the most recommended and popular ways to take screenshots on your Windows PC or laptop. Snipping tool is a built-in tool that you get on your Windows PC.
Although the name of this tool has been changed to Snip & Sketch, it comes built-in with Windows PC or laptop. So, you don’t need to install a 3rd party software to use Snipping tool on your Windows PC or laptop.
Is There a Snipping Tool on Chromebook?
Yes. There’s an option available on ChromeOS that helps you to select the area and take partial screenshots on your Chromebook. Although the name of the tool is not Snipping tool or Snip & Sketch, you get the same feature on this tool as you get on Snipping tool.
The feature that helps you to take partial screenshots on Chromebook doesn’t have a name, really. It is just the official way to take screenshots on your Chromebook. However, you get the same features of Snipping tool when you use the official method to take screenshot on your Chromebook.
How to Use Snipping Tool on Chromebook?
Below, we have described how you can use the snipping tool like feature on your Chromebook and take partial screenshots easily. So, you can just follow the step-by-step guide below and take screenshots easily without any issues.
To use the snipping tool like feature of your Google Chrome, you just have to use a shortcut on your Chromebook. Below, we have described the steps that’ll help you to take screenshots.
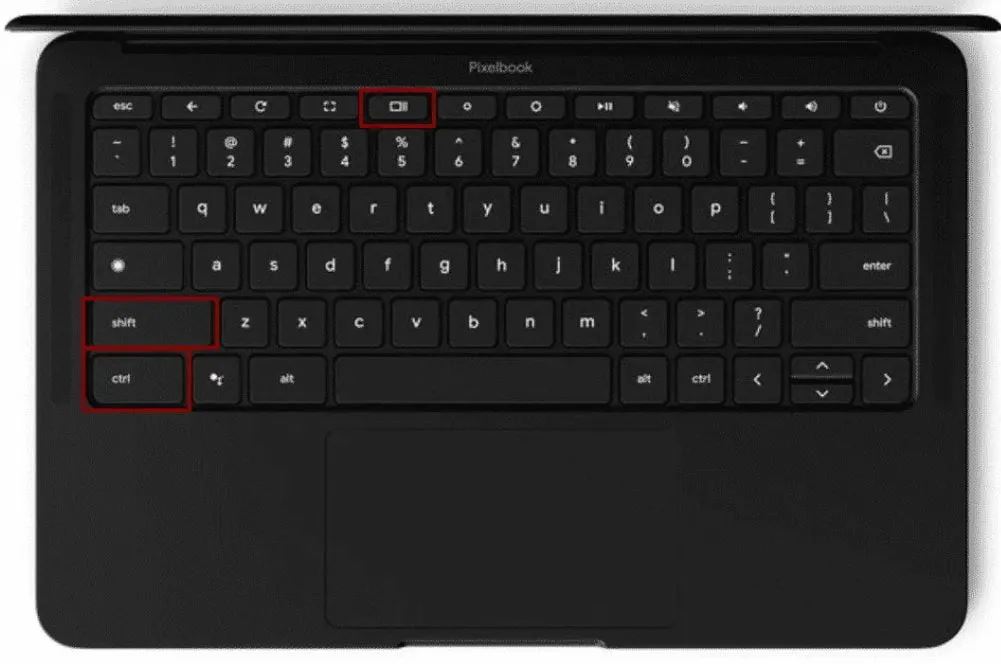
- First of all, open the page or window that you want to capture on your Chromebook.
- Then, press the Shift+Ctrl+Switch window button to open the selection tool to capture screenshot. The switch window button is the fifth button from the upper row of the keyboard of Chromebook. It has rectangular and has two lines to the right.
- You’ll see that it has opened a selection tool on your Chromebook, similar to the snipping tool you get on your Windows PC or laptop.
- Now, just select the area that you want to capture.
- After selecting the area, just release the selection, and it’ll take the screenshot on your Chromebook.
That’s it. It’ll save the screenshot to your Chromebook. You can use the steps mentioned above anytime when you want to take a partial screenshot on your Chromebook. (Ambien Generic)
How to take Full Page Screenshots on Chromebook?
If you want to take full page screenshot instead of taking partial screenshot on your Chromebook, then you can also do that. It’ll help you to capture your full screen instead of just selecting a particular are. This feature is similar to the full page screenshot of Windows that we can do with the help of Windows + PrtScr shortcut keys.
Below, we have described how you can take full-page screenshots with the built-in option on your Chromebook. So, just follow the step-by-step guide below to do that.
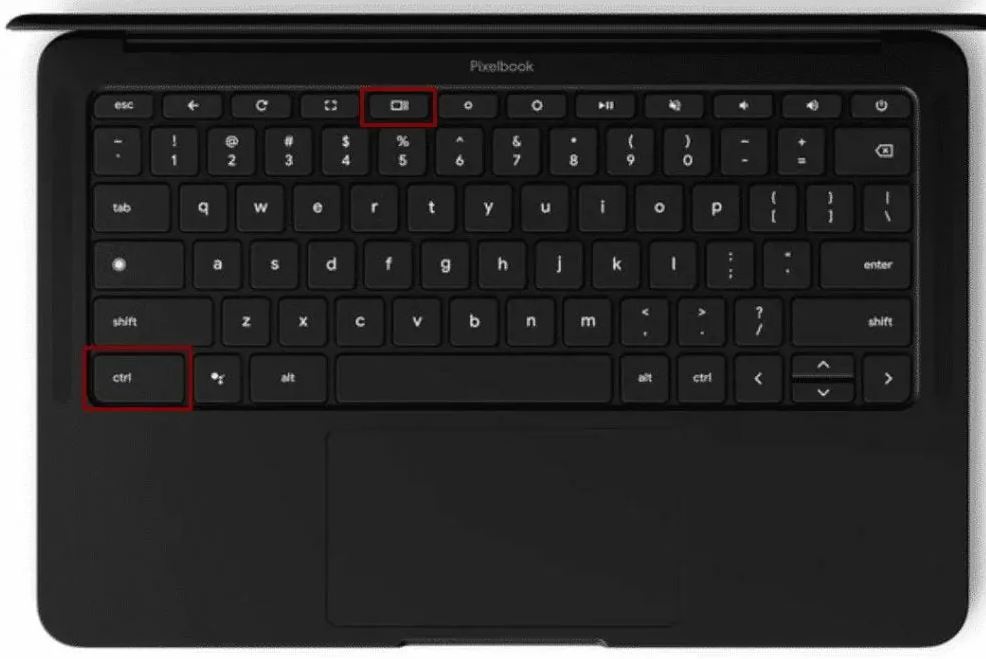
- First of all, open the page or window that you want to capture.
- Now, press the Ctrl + Switch Window button on your Chromebook.
- That’s it. You’ll see that it has captured a screenshot on your Chromebook. Now, you can locate the captured screenshot, and use it anywhere.
Alternatively, you can go to the notification section of your Chromebook and select the ‘Screen capture’ option to capture your screen. When you use this option, it’ll open the screen capture tool on your Chromebook. So, you can select if you want to capture partial or full screen or if you want to record your screen from this option easily.
How to Locate Screenshots on Your Chromebook?
After capturing the screenshot, many people couldn’t find the screenshot on their PC. So, if you want to locate the screenshot, you can locate it in the ‘Downloads’ folder of your Chromebook.
If you want to change the screenshot folder, you can go to Settings>Select Folder option and change the folder where your screenshots will be saved. It’ll help you to locate your screenshot where it’s saved.
Best Snipping Tools Alternative for Chromebook
If you don’t want to use the built-in tool to take a partial screenshot on your Chromebook but want to use alternative software, you can also do that. Below, we have described the alternatives to the snipping tool that’ll help you to capture the window of your Chromebook easily.
1. Lightshot
The first alternative that you can use on your Chromebook to take screenshot is the Lightshot tool. Lightshot is a free tool that you can add to your Google Chrome web browser, and take screenshot easily. It has a partial screenshot option that lets you easily capture a portion of your screen without any issues.
2. Awesome Screenshot & Screen Recorder
Awesome screenshot & screen recorder is another good free screenshot-taking and screen-recording tool that’ll help you to take screenshots and capture your screen easily without any issues. It has various customization options that’ll let you customize the screen capturing on your Chromebook.
3. Nimbus Screenshot
Nimbus Screenshot and screen capturing tool is another good tool that’ll help you take screenshots on your Chromebook. It also has a screen recording option that lets you easily record your screen without any issues. Using this tool, you can also annotate your screen and edit the screenshot easily. So, Nimbus screenshot is a good tool that’ll help you to take screenshots.
Frequently Asked Questions (F.A.Q)
Is Snipping tool available on Chromebook?
The same snipping tool that you get on Windows isn’t available on Chromebook. However, you can use the built-in feature of Chromebook to capture your screen easily without any issues. It has the same features as the Snipping tool. So, you won’t face any issues taking screenshots with the built-in feature of Chromebook.
Do I need to download software to capture the Chromebook screen?
No. ChromeOS has a built-in option to take screenshots. So, you don’t need to download any 3rd party software to take screenshots. You can use the built-in shortcut keys on your Chromebook to do that easily.
What is the best screenshot tool for Chromebook?
Above, we have mentioned the best screenshot-taking tools that you can get on your Chromebook. This includes Lightshot, Nimbus screenshot, and Awesome screenshot. So, if you don’t want to use the built-in screenshot tool, you can use the above mentioned tools to capture your screen easily.
Conclusion
It’s really easy to take screenshots on your Chromebook. You can just follow the guide mentioned above and use the snipping tool feature on your Chromebook without any issues. You can ask in the comment section below if you have any questions or queries. You can also provide your feedback in the comment section.

![How to Fix Google Play Store Error Checking for Updates [2023]](https://thetechyinfo.com/wp-content/uploads/2023/10/How-to-fix-Google-Play-Store-error-checking-for-updates-768x431.jpg)