
How to Find Trash on Facebook in 2024
Sometimes, we delete files by mistake on our computers and laptops. But, thanks to the recycle bin feature of Windows, we can restore deleted files easily. But what about Facebook posts? Well, 4-5 years ago, we couldn’t recover our deleted posts on Facebook. But now, we can do that easily. Facebook has introduced the recycle bin feature that helps users to restore deleted Facebook posts. And in this guide, we have described how to find the trash or recycle bin on Facebook, and how to restore your posts.
So, if you have deleted a post by mistake, or if you want to restore a deleted post in your Facebook account, just follow the guide below. We have described the steps to find trash on Facebook and restore deleted posts to your timeline. We also have described how the Facebook trash or recycle bin works and if you can restore the deleted posts anytime. So, read this guide completely if you want to know about it. You can also read about how to find memories on Instagram.
What is Trash or Recycle Bin on Facebook?
It’s been a while since Facebook added the recycle bin feature to their platform. Thanks to this feature, users can now restore their recently deleted posts easily without any issues. They’ll appear in the timeline as they were never deleted. But, there’s a catch.
You can only restore posts from the Facebook recycle bin or trash within 30 days of the date of deletion. That means, after 30 days, the posts, photos or videos will be permanently deleted. So, you won’t be able to restore them after 30 days.
If you want to restore posts anytime you want even after 30 days, you have to use the archive feature. This helps you to archive any post, photo, or video on Facebook. So, they won’t be deleted but archived.
Compared to the recycle bin, the archive feature is more useful as you can restore the posts anytime you want. However, if you are not sure whether you’ll restore the posts or not, then you can use the recycle bin or trash feature. Below, we have described how you can access it.
How to Move Facebook Posts to Recycle Bin or Trash?
Deleting the posts and moving them to the recycle bin is really easy. Below, we have described how you can do that. So, just follow the step-by-step guide to delete your posts and move to recycle bin or trash on Facebook.
- First of all, open the post on Facebook that you want to delete.
- Then, click on the three dots to show options for the post.
- Now, click on the ‘Move to recycle bin’ option to move the post to recycle bin or trash.
That’s it. It’ll move the file to the recycle bin.
How to Find Recycle Bin or Trash on Facebook?
To find the recycle bin or trash on Facebook, you can just follow the guide below.
On App
If you are using the Facebook app, then follow the steps below to find the recycle bin or trash on Facebook.
- First of all, open the Facebook app on your device.
- Then, click on your profile picture from the upper right corner.
- Now, scroll down and select the ‘Settings & Privacy’ option then choose the ‘Settings’ option from there.
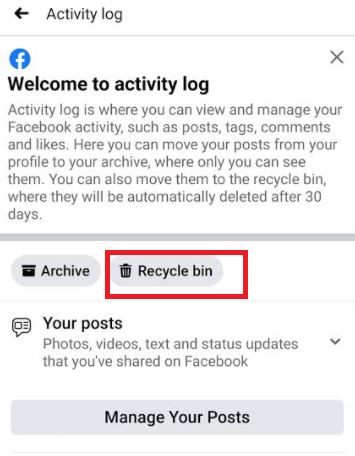
- After that, scroll down to the ‘Your activity’ section and select the ‘Activity log’ option from there.
- Now, choose the ‘Recycle bin’ option.
You’ll find recently deleted files in this option. From there, you can choose if you want to permanently delete the file or want to restore it.
On Website
You can also find and restore your Facebook posts from the trash using the Facebook website instead of the app. Just follow the guide below to do that.
- First of all, open the Facebook website and log-in with your account.
- Then, go to the ‘Settings & privacy’ option and choose the ‘Settings’ option from there.
- Now, choose the ‘Activity log’ option from there.
- From the left panel, select the ‘Recycle bin’ option.
You’ll find the deleted posts there. You can also restore the posts or permanently delete them.
Conclusion
Finding trash on Facebook is really easy. Just follow the above guide to do that. If you liked this guide, you can share it on your social media platforms. Just use the share buttons below to do that. If you have any questions or queries, you can ask in the comment section below. You can also provide your feedback in the comment section.